Intersect, Join and Subtract Operations
- Overview of Intersect Operations
- Overview of Join Operations
- Overview of Subtract Operations
- Performing an Intersect, Join or Subtract Operation
- Specifying Linking Criteria
- Specifying the Fields to Include in the Result Table
- Specifying Filter and Order Criteria
- Using the Intersect, Join, and Subtract Genies
Description
A guide to performing intersect, join, and subtract operations and how to use intersect, join, and subtract Genies.
Overview of Intersect Operations
An Intersect operation takes the records that two tables have in common and uses them to create a new table. For example, you have two tables containing customer data. One contains customer identification numbers and names, the other contains customer identification numbers and telephone numbers, as shown in the following diagram:
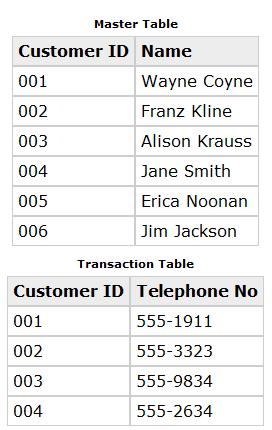
By using an Intersect operation, you can create a table of customers that contains both names and telephone numbers. Any record from the master table which does not match a record in the transaction table is excluded from the result table.

Overview of Join Operations
A Join operation takes data from two tables and inserts it into a result table. The result table contains the same number of records as the master table. For example, you have two tables that contain data about customers. One contains customer identification numbers and names, the other contains customer identification numbers and telephone numbers, as shown in the following diagram:
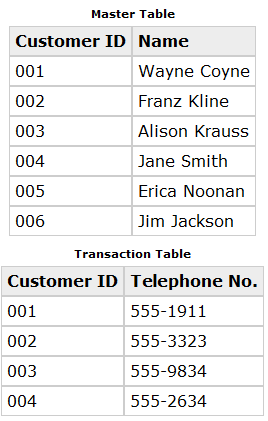
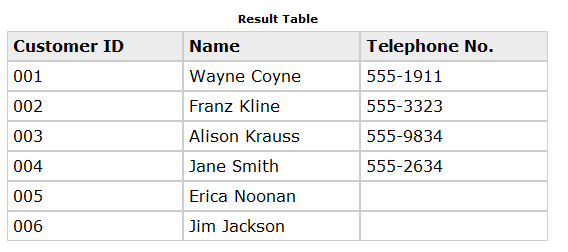
By using a Join operation, you can use the data in each table to form a new table:
Overview of Subtract Operations
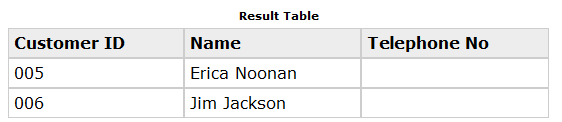
A Subtract operation takes records from the master table which do not have matching records in the transaction table and copies them to the result table. The result table can contain fields from either the master table or the transaction table, but in all cases the transaction table fields are blank. For example, you have two tables containing customer data. One contains customer identification numbers and names, the other contains customer identification numbers and telephone numbers, as shown below:
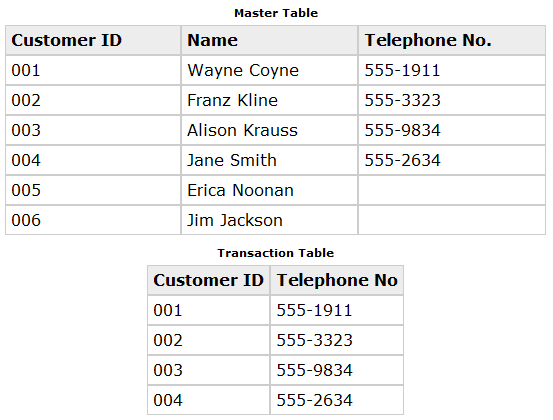
By using a Subtract Operation, you can create a table of customers which do not have telephone numbers. Any record in the master table that does not match a record in the transaction table is included in the result table; the others are excluded.
If you just want to remove records from an existing table, you might want to refer to Removing Records.
Performing an Intersect, Join or Subtract Operation
Click the Operations tab on the Control Panel.
Click the New button. The Create New Operation dialog box appears.
Select "Intersect/Join/Subtract tables" as the operation.
Select the Master table from the Select Table/Set list.
Click the Create button to display the Join Builder or check the More check box and click Create Using Genie to display the Intersect, Join, or Subtract Genies (see Using the Intersect Genie ).

Select the "intersect", "join", or "subtract" from the Operation list.
Select the Transaction and Result tables. In both cases you can click on the Drive button to use the File dialog box.
Specifying Linking Criteria
The linking keys are the fields or expression you use to indicate the fields the master and transaction tables have in common.
Select the Linking key expressions for the Master and Transaction tables.
Specifying the Fields to Include in the Result Table
At the bottom of the Join Builder are three list boxes which you use to determine the fields to include in the result table. To add a field to the result table, click and drag it from the Master Fields list box or the Transaction Fields list box and drop it in the Result Fields list box. If you want to include every field in the master or transaction table, click the Select All button at the bottom of either the Master Fields or Transaction Fields list box. You can remove unwanted fields from the Result Fields list box by highlighting them and pressing Delete. To highlight multiple fields, hold down SHIFT and click on the fields you want to remove.
In the Field lists indicate the fields from the Master and Transaction tables that should be included in the Result table.
Specifying Filter and Order Criteria
If you want to filter-out records from the master table or the transaction table so they are not included in the Intersect operation, you can enter filter expressions in the appropriate Filter boxes. For a record to be selected, it must cause the filter expression to evaluate to TRUE.
Optionally, specify Filter expressions for the Master and Transaction tables.
Optionally, click this icon to specify additional filter or order expressions for the Master and Transaction tables.

Click the lightning icon button to run the operation.
Using the Intersect, Join, and Subtract Genies
When the genie starts, click Next > to continue.
Enter the name of the transaction table.
Click Next > to continue.
Enter the name of the result table.
Optionally, click the Advanced Options button to display the Advanced Options dialog box.
Choose whether to warn before overwriting an existing table.
Click OK to continue or Cancel to discard your input.
Click Next > to continue.
Specify the linking fields or expressions for the Master table and Transaction table fields.
Optionally, click ... to display the Advanced Option dialog box to specify options for using field values.
Click OK to continue or Cancel to discard your input.
Click Next > to continue.
Select the fields that you wish to include in the Result Table.
Click Next > to continue.

Optionally, specify additional filtering (a logical expression ) and ordering (a character expression ) criteria for the Master table.
Click Next > to continue.
Optionally, specify additional filter or order criteria for the Transaction table.
Click Next > to continue.
Indicate whether you want to run the operation now, save the operation and then run it, or view the settings of the Intersect/Join/Subtract Card.
Click Finish.
If you selected Run the Intersect/Join/Subtract operation now, (but first save the definition for future use), the Save Intersect/Join/Subtract settings as... dialog box will appear.
Enter the name of the operation into the Name field and click OK.
If you selected Don't run the Intersect/Join/Subtract operation now, just show me how the genie has filled in the Intersect/Join/Subtract card, the Intersect/Join/Subtract Card will appear.
Optionally, click Save to display the Save intersect/join/subtract settings as... dialog box.
Enter the name of the operation into the Name field and click OK.
Optionally, click the Run button on the toolbar to run the operation.
Limitations
Desktop Applications Only
See Also